The "Business" of the Black Tank
Let’s go ahead and get the unpleasant, and obvious, out of the way: this is not the most pleasant of topics. We’re talking about holding and removing human waste from an RV, and while RV waste holding tanks aren’t the most glamorous topic that we get to cover when talking about our RV’s, it certainly is an important one.
1. Background
An RV has two types of waste tanks on board: a grey water tank, and a black water tank. A grey water tank collects the water that goes down the drain of your RV shower and sinks. It is the presence of soap residue and dirt that give this waste its name and grey-ish look.
A black water tank collects waste from your RV toilet only. The black water tank collects both liquids and solids, so caring for it is a bit different than your grey tank. In addition to human waste, the RV black tank also collects water used to flush the toilet, and of course, toilet paper.
2. Start With The Right Base
If you want to keep your RV black water tank working properly, and (relatively speaking) clean, it’s important to know that your RV septic tank should always start with some water in it as a base. Think of your toilet at home: there is water in the bowl before you “do your business” for two reasons. First, it keeps odours from permeating your living space; second, having water in the bowl first helps make sure any solids that enter the bowl can move along without sticking.
3. RV Black Tank Chemicals
Now that you have a base of water in your RV black water tank, it’s important to add a holding tank chemical to it, by dumping some down the toilet. A holding tank chemical is an environmentally-safe liquid that is added to the RV black water tank to help break down waste and tissue, as well as to help control odours that build up in the tank. The chemical you choose will have instructions on how much you should add, but if you are a weekend warrior in your RV, generally a couple of ounces is sufficient to get you through the weekend.
4. Emptying Your RV Black Tank
Now that you’ve made it through the weekend, you’ll want to find an approved place to dump your waste tanks. Hook the waste hose to your RV (according to your manufacturer’s specs), and secure the other end to the dump station.
You are going to be emptying both your grey and black water tanks, but it is important to remember to ALWAYS empty your black water tank first. Once it is done emptying, close the valve for the RV black water tank, then open the valve to empty the RV grey water tank. The reason you empty the black water tank first is so that the relatively “cleaner” water coming from the grey water tank can flush out any waste left in the hose.
5. RV Black Tank Flushing
In addition to emptying your tank after use, from time to time you’ll want to do a more thorough cleaning of your RV black water tank. Waste and tissue can build up in the tank, causing potential clogs, and playing games with the sensors that indicate how full your tank is.
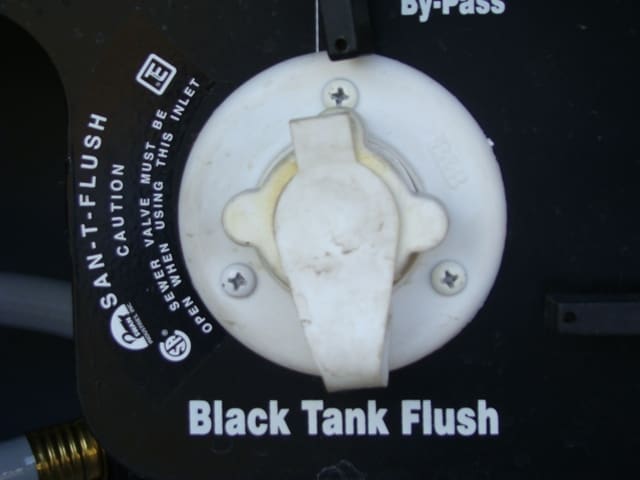
Many RVs come equipped with an RV black tank flush valve. In this case, you simply hook a hose to the rinse valve, and run water into the tank to flush it out. If your RV does not come equipped with a manufacturer’s tank flush, you do have the option of adding an after-market flush valve — this type of option comes in many shapes and sizes, and typically requires drilling a hole in your RV black water tank.
If you don’t have a manufacturer’s tank flush valve, and you don’t wish to add one, one of the more popular options is a garden hose extension called an RV holding tank rinser. This rinser is designed to send water in multiple directions to clean debris and tissue from the sides of your tank.
To use the holding tank rinser, first make sure that your RV is not hooked up to a city water connection, and that your RV water pump is shut off. Next, open up the flush valve to your RV toilet, and insert the holding tank rinser into the toilet, so that it goes down into the black water tank. When you turn the water on, the rinser will send water in multiple directions — turn and twist the rinser to make sure you get as much of the sides cleaned as possible. Once this is done, you can empty your tank as normal.
Dealing with your RV black water tank is definitely one of the more unpleasant areas of using an RV, but the comfort and privacy that having an RV toilet on board affords you and your family is one of the biggest advantages to having an RV. Understanding your RV black water tank, and how to clean it, will give you years of comfort and odourless enjoyment.